

Getting Started with ChatGPT API
Hey there! I’m excited to walk you through the ChatGPT API key setup process. Trust me, it’s simpler than you might think, and it’s going to open up a whole new world of possibilities for your projects.
Setting up your API key is like getting the keys to a powerful new vehicle. In just a few minutes, you’ll be ready to harness OpenAI’s impressive language models for your own applications. The process is refreshingly straightforward: create an account, steer to the API section, generate your key, securely save it, add payment details, and set some usage limits to keep your budget in check.
The ChatGPT API has absolutely exploded in popularity – with over 100 million users and roughly a billion monthly visits, it’s clear I’m not the only one excited about this technology! But here’s the important difference: while millions use the free ChatGPT interface, the API gives you something special – the ability to customize and integrate these AI capabilities directly into your own systems and workflows.
“ChatGPT has been a game-changer in text-based generative AI. It’s not just a simple chatbot. It’s a sophisticated model that can revolutionize how we interact with technology.”
Hi there – I’m digitaljeff, a tech entrepreneur who’s helped brands implement ChatGPT API key setup to build AI applications that generate billions of views. From coding the technical integration to developing strategic workflows, I’ve seen how transformative this technology can be for businesses of all sizes.

Want to dive deeper into the ChatGPT ecosystem? Check out these helpful resources:
Why You Need an API Key
Think of your API key as a digital passport to OpenAI’s services. It’s not just a random string of characters – it’s your personal access point that makes everything possible.
When you make a request with your ChatGPT API key, OpenAI can identify who you are, which helps them track your usage and bill you accurately. Your key also determines which models you can access (like the more advanced GPT-4), allows OpenAI to monitor usage to enforce rate limits, and ensures you only pay for what you actually use.
The real magic happens when you start building with your API key. I’ve seen businesses transform their operations with applications like intelligent customer support chatbots that handle routine questions 24/7. Content creators are using the API to generate blog posts, product descriptions, and marketing copy at impressive scale. Data analysts are extracting valuable insights from mountains of unstructured text.
I recently spoke with a developer who told me: “Having direct API access to ChatGPT transformed our customer service workflow. What used to take hours of manual responses now happens automatically, and our customers can’t tell the difference.”
Educational platforms are creating personalized learning assistants. Companies are building internal knowledge bases that can instantly answer questions about company documentation. The possibilities are truly endless – from language translation tools to coding assistants that help developers debug and generate code.
What You’ll Learn Today
I’ve designed this guide to take you through the entire ChatGPT API key setup process from start to finish. By the time we’re done, you’ll have everything you need to start building with confidence.
We’ll begin with the basics – creating your OpenAI account and navigating the developer platform. I’ll show you exactly how to generate your API keys and, importantly, how to keep them secure. Security isn’t optional when it comes to API keys, so I’ll share best practices I’ve learned from working with dozens of implementations.
Managing costs is another crucial aspect we’ll cover. I’ll walk you through setting up billing and implementing usage limits so there are no surprise charges. Then we’ll get practical with code examples in both Python and JavaScript, so you can see exactly how to use your key in real applications.
We’ll also dive into monitoring your usage, understanding rate limits, and troubleshooting common errors. I’ve encountered most of the typical problems myself, so I can help you avoid the same pitfalls.
Let’s get your ChatGPT API key up and running – I’m excited to see what you’ll build with it!
ChatGPT API Key Setup: Step-by-Step
Prerequisites for chatgpt api key setup
Getting started with the ChatGPT API is exciting, but there are a few things you’ll need to have ready before diving in. Think of these prerequisites as your API trip starter pack:
First, you’ll need an OpenAI account – this is your gateway to all of OpenAI’s powerful tools. You’ll also need to complete phone verification, which OpenAI requires to activate your API access (they take security seriously!).
Don’t forget about payment – you’ll need a valid payment method like a credit card, and you must add a minimum $5 credit to your account before you can start sending those API requests.
Unlike the ChatGPT web interface where you can chat for free, the API is strictly pay‑as‑you‑go. As one user in our community mentioned: “Sadly there is no model for free to test through the API.”
But don’t worry about breaking the bank! The initial investment is quite reasonable. Many casual users in our community have found that “$20 worth of tokens is more than enough to test the API or casually use an OpenAI‑enabled software product for several months.” That’s a lot of AI power for the price of a few coffees!
Create Your OpenAI Account
Let’s get you set up with an OpenAI account – it’s quick and painless:
Head over to platform.openai.com/signup where you can sign up with your email address or take the express route using your Google or Microsoft account. Follow the simple prompts to create your account, and don’t forget to verify your email by clicking the link that lands in your inbox. The final step is completing the phone verification when prompted.

Once you’ve completed these steps, you’ll be directed to the OpenAI dashboard – your command center for all things API. This is where you’ll manage your API keys, keep an eye on usage stats, and access helpful documentation.
A common mix‑up I see all the time is people heading to chatgpt.com instead of platform.openai.com. The ChatGPT web interface and the API are separate services, even though they’re powered by the same amazing technology under the hood.
Generate and Store Your chatgpt api key setup
Now comes the exciting part – generating your very own API key:
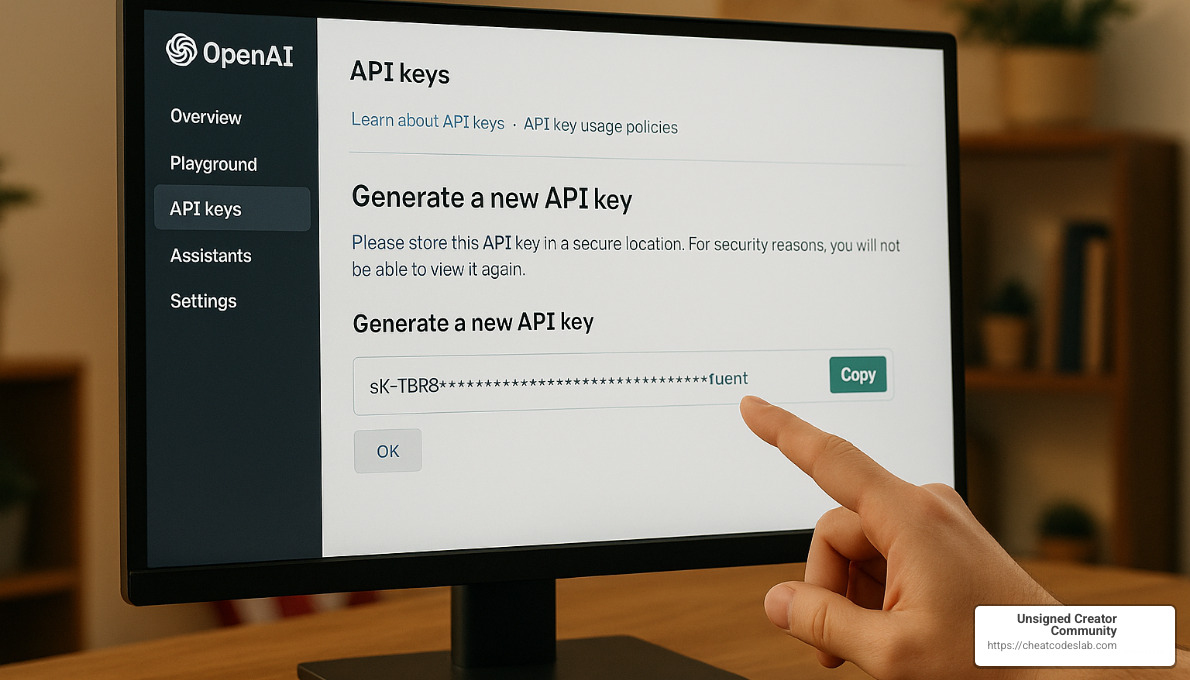
Log in to platform.openai.com and click on your profile icon in the top‑right corner. Select “View API keys” from the dropdown menu, and on the API Keys page, click the “Create new secret key” button. Give your key a descriptive name that will help you remember what it’s for – something like “My Amazing AI Project” or “Customer Support Bot.”
Click “Create secret key” and then – this is super important – copy your key immediately and store it securely. The key will only be shown to you once, and if you miss it, you’ll need to create a new one.

Naming your keys descriptively is like labeling your house keys – it saves confusion later. If you’re building a customer service bot, a name like “Customer‑Service‑Bot‑2023” will make perfect sense six months from now.
One developer in our community shared this cautionary tale: “I learned the hard way about copying the key immediately. I got distracted, closed the tab, and had to generate a new key. Now I always have a password manager open and ready before I create a new key.” Learn from their mistake!
It’s worth noting that API keys are general‑purpose – one key can access all OpenAI services including GPT‑3.5‑turbo, GPT‑4, DALL‑E, and others. You’ll specify which model you want to use when you make the API call, not when you create the key.
Set Up Billing & Usage Limits
Before your new API key can work its magic, you need to set up billing – think of it as putting fuel in your AI tank:
In the OpenAI dashboard, click on “Billing” in the left sidebar and add your preferred payment method. Add funds to your account (remember, the minimum is $5), and then – this is crucial – configure usage limits to keep your spending in check.
Setting usage limits is like putting a governor on a sports car – it helps you enjoy the ride without worrying about going too fast:
Steer to “Limits” in the sidebar, scroll to “Usage Limits,” and set both soft and hard caps. Your soft cap will send you a friendly notification when reached, while your hard cap will temporarily disable API access when hit – protecting your wallet from unexpected surprises.
This two‑tiered approach is particularly helpful when you’re just testing the waters or when you’re sharing API access with team members. As one relieved user put it after setting up limits: “Whew. I’m glad I don’t have to worry about that anymore. Now I just have to watch my spending.”
The chatgpt api key setup billing model is refreshingly straightforward – you only pay for what you use, measured in tokens (pieces of text). As a rough guide, about 750 words equals approximately 1,000 tokens. Different models have different pricing tiers, with GPT‑4 commanding a premium over GPT‑3.5‑turbo.
For more detailed information about pricing and available models, the OpenAI documentation has everything you need.
And if you’re ready to start building with your new API key, our ChatGPT API Tutorial will help you hit the ground running with practical examples and best practices.
Secure Usage, Billing & Troubleshooting
Securing & Storing Your Key
Let’s talk about keeping your chatgpt api key setup safe – this is really important because that key is directly linked to your billing account! Think of your API key like your credit card – you wouldn’t leave that lying around, right?
Here’s how I keep my keys secure (and how you should too):
Never put your key directly in your code – especially if that code is going to end up on GitHub or another public repository. I learned this lesson the hard way when a key I accidentally committed led to some unexpected charges!
Instead, use environment variables to store your key separately from your code. This is super simple and gives you that extra layer of protection.
For serious projects, consider using proper secret management tools like AWS Secrets Manager or HashiCorp Vault. These are what the professionals use for a reason.
“Treat your API key like a password—store it in a secure vault.”
If you’re working with a team, be careful about who gets access to the keys. I recommend creating separate keys for different team members or projects – this makes it easier to track usage and revoke access when needed.
Here’s how I implement this in my JavaScript projects using a .env file with the dotenv package:
// Load environment variables from .env file
require('dotenv').config();

// Access the API key
const apiKey = process.env.OPENAI_API_KEY;
And in Python, it’s just as straightforward:
import os
from openai import OpenAI

# Access the API key from environment variables
client = OpenAI(api_key=os.environ.get("OPENAI_API_KEY"))
If you ever suspect your key has been compromised, don’t panic – just revoke it immediately and generate a new one. Better safe than sorry!
Using the Key in Code (Python & JavaScript)
Now that we’ve got our key safely stored, let’s put it to work! I’ll walk you through setting up basic API calls in both Python and JavaScript – these are the languages I use most often with the chatgpt api key setup.
For Python lovers, first install the OpenAI library:
pip install openai
Then, here’s a simple script to get you started:
import os
from openai import OpenAI

# Initialize the client with your API key
client = OpenAI(api_key=os.environ.get("OPENAI_API_KEY"))

# Make a request to the ChatGPT API
response = client.chat.completions.create(
    model="gpt-3.5-turbo",
    messages=[
        {"role": "system", "content": "You are a helpful assistant."},
        {"role": "user", "content": "Who are you?"}
    ]
)

# Print the response
print(response.choices[0].message.content)
If JavaScript is more your thing, install the OpenAI Node.js library:
npm install openai
And here’s how to use it:
import OpenAI from 'openai';

// Initialize the client with your API key
const openai = new OpenAI({
  apiKey: process.env.OPENAI_API_KEY
});

async function callAPI() {
  const response = await openai.chat.completions.create({
    model: "gpt-3.5-turbo",
    messages: [
      { role: "system", content: "You are a helpful assistant." },
      { role: "user", content: "Who are you?" }
    ]
  });

  console.log(response.choices[0].message.content);
}

callAPI();
In both examples, we’re doing the same basic steps: initializing the OpenAI client with our API key, making a request to the chat completions endpoint with our chosen model, and then processing the response.
For more details on all the parameters and response formats, check out the OpenAI API reference. I reference this constantly, even after months of working with the API!
Monitoring Rate Limits & Spending
One thing that caught me by surprise when I first started with the chatgpt api key setup was hitting rate limits. Nothing’s more frustrating than having your application suddenly stop working because you’ve hit a limit you didn’t know existed!
OpenAI has two types of limits you need to watch:
Tokens per minute (TPM) – This is the total number of tokens (both input and output) that you can process each minute.
Requests per minute (RPM) – This is how many separate API calls you can make per minute.
Different models have different limits, and they can be quite different:
| Model | Tokens Per Minute (TPM) | Requests Per Minute (RPM) |
|---|---|---|
| GPT-3.5-turbo | 90,000 | 3,500 |
| GPT-3.5-turbo-16k | 180,000 | 3,500 |
| GPT-4 | 10,000 | 200 |
Notice how GPT-4 has much stricter limits – this caught me off guard when I first upgraded!
To keep an eye on your usage, head to the OpenAI dashboard and click on “Usage” in the sidebar. This shows your token usage over time and your current rate limits. I check this at least weekly for my active projects.
For busy applications, I’ve found these strategies helpful:
- Cache common responses so you’re not repeatedly asking the same questions
- Batch similar requests together when possible
- Add exponential backoff for rate limit errors (wait a bit, then try again)
- Set up email alerts before you hit your limits
As one developer told me, “I monitor my prepay balance and spending regularly. It helps me catch any unexpected usage patterns before they become expensive.” Wise words!
Revoking & Rotating Keys
Part of good chatgpt api key setup hygiene is regularly changing your keys. Think of it like changing your passwords – it’s just good practice.
Here’s how I rotate my keys:
- Log into my OpenAI dashboard
- Go to the API Keys page
- Create a new key (remember to give it a descriptive name!)
- Update my applications with the new key
- Test that everything works with the new key
- Revoke the old key by clicking the “Revoke” button next to it
There are times when you should immediately revoke a key – no waiting around. These include:
- If you think someone unauthorized has your key
- When a team member who had access leaves the company
- If you accidentally committed your key to a public repo (we’ve all been there!)
- When you notice strange usage patterns or unexpected charges
Revoking a key is instant – any applications using that key will stop working immediately. Always update your apps with the new key before revoking the old one, unless there’s a security emergency.
Common Errors & Quick Fixes
Even with perfect chatgpt api key setup, you’ll occasionally run into errors. Here are the ones I see most often and how I fix them:
401 Unauthorized is usually a sign that something’s wrong with your API key. Double‑check that you’re using the correct key and that it’s being passed properly in your requests. I once spent hours debugging only to realize I had a typo in my environment variable name!
429 Too Many Requests means you’ve hit the rate limits we talked about earlier. The solution is to slow down your requests, implement a backoff strategy (wait longer between retries), or contact OpenAI to request higher limits for your account.
500 Server Error comes from OpenAI’s side, not yours. The best approach is patience – wait a bit and try again, ideally with exponential backoff (wait longer after each failed attempt).
“Model not found” or access denied errors usually mean you’re trying to use a model you don’t have access to, like GPT‑4. Make sure you’ve added credit to your account (at least $5) and check the rate limits page to confirm you have access.
Billing verification required means there’s an issue with your payment method. Head to your billing settings to sort it out.
One issue I see a lot in our community is trying to access GPT‑4 after setting up billing. As one user shared: “I deleted my pay‑as‑you‑go plan and added a new prepay plan with $5 to finally enable GPT‑4 access.” Sometimes you need to be a bit creative with the billing setup!
If you run into persistent issues, the OpenAI Help Center is super helpful.
Real-World Examples & Best Practices
Let me share some exciting ways I’ve seen the chatgpt api key setup put to work in real applications:
A retail company I worked with implemented a ChatGPT‑powered chatbot that now handles 80% of their customer questions automatically. The magic is in their system prompt that defines the bot’s personality and knowledge about their specific products. They also include recent order history in the context for personalized responses, and have a smooth handoff to human agents for complex issues.
Another client, a marketing agency, uses the API to generate first drafts of blog posts. They save hours of writing time by providing an initial prompt with audience details, tone requirements, and key points. Human writers still review and edit the output, but they’ve cut their content production time in half!
I was also impressed by how Duolingo integrated the ChatGPT API to create more engaging language practice. Their custom prompts guide conversations in the target language, and they adjust difficulty based on student responses. It feels much more natural than their previous scripted conversations.
Here’s my personal best practices checklist that I share with all new API users:

The most important practices I follow include:
- Storing API keys securely in environment variables or dedicated secret managers
- Rotating keys regularly as part of normal security practice
- Using the most cost‑effective model for each task (GPT‑3.5‑turbo is perfect for most cases!)
- Implementing caching for common requests to save on tokens
- Setting clear usage limits to avoid surprise bills
- Optimizing prompts to use fewer tokens while getting great results
- Adding retry logic with exponential backoff for reliability
- Being transparent with users about AI‑generated content
As an experienced API user told me, “Token‑efficient prompt design is crucial to balance cost and response quality. I’ve reduced my token usage by 40% just by optimizing my prompts.” That’s money in the bank!
Conclusion & Next Steps
Congratulations! You’ve successfully completed the chatgpt api key setup process from start to finish. What began as a simple API key has now opened up a world of AI possibilities for your projects and workflows.
Throughout this guide, we’ve walked together through every crucial step – from creating your OpenAI account to implementing security best practices that will protect both your key and your wallet. The journey might have seemed technical at times, but you’ve made it through!
At CheatCodesLab, we’ve seen how mastering this setup process transforms what creators can build. The most successful API users aren’t necessarily coding experts – they’re the ones who take time to understand the fundamentals we’ve covered here.
Key Takeaways Worth Remembering
Your chatgpt api key setup journey has equipped you with several important skills. You now understand how to properly secure your key (treat it like your most valuable password!), set practical usage limits to prevent surprise bills, and implement the API in actual code.
Perhaps most importantly, you’ve learned that starting with GPT-3.5-turbo makes sense for most projects. It offers that sweet spot between capability and cost that makes it perfect for experimentation and many production use cases.
The monitoring tools we explored will become your best friends as your usage grows. Keep an eye on those dashboards – they’ll help you spot patterns and optimize your implementation over time.
Where To Go From Here
Your learning journey doesn’t end with chatgpt api key setup. In fact, this is just the beginning! As you build with the API, you’ll develop a feel for prompt engineering – that delicate art of crafting inputs that produce exactly the outputs you need.
Many creators in our community start with simple automation projects and gradually work their way up to more complex implementations. Don’t be afraid to experiment, and remember that even small optimizations to your prompts can significantly reduce your token usage and improve results.
The AI landscape evolves incredibly quickly. New models, features, and best practices emerge almost weekly. Staying curious and connected to communities of practice will help you make the most of these powerful tools.
Join Our Community of AI Creators
At Unsigned Creator Community’s CheatCodesLab, we believe in making advanced AI tools accessible to everyone. We’re building a community of creators who share knowledge, techniques, and inspiration.
The chatgpt api key setup process you’ve completed today is your entry ticket to this exciting world. Whether you’re building a customer service bot, generating content, or creating an educational tool, you now have the foundation to bring your ideas to life.
Ready to explore more AI tools and techniques? Our AI tools collection offers plenty of resources to fuel your next project. The possibilities are endless, and we can’t wait to see what you build!
Have you completed your chatgpt api key setup? What are you planning to create with it? Share your experiences or questions in the comments below – our community loves helping fellow creators succeed with AI!


About the author


Free Long-Tail Keyword Tools: A Comprehensive List
Discover top free Long-tail keyword tools for 2025. Boost SEO, track trends, and find high-converting keywords easily today!

Enhance Your Videos with Instagram Closed Captions
Learn how to use closed caption instagram for better accessibility, engagement, and reach. Step-by-step setup, tips, and best practices.

Selling Used Camera Gear: Tips and Tricks
Discover the best way to sell camera equipment with expert tips, safe selling methods, top marketplaces, and pricing strategies.

How AI and Machine Learning are Revolutionizing Digital Marketing
Discover how artificial intelligence and machine learning in digital marketing boost ROI, personalization, and future-ready strategies.

How AI is Revolutionizing Supply Chain Management: A Step-by-Step Guide
Discover how AI tools for supply chain boost efficiency, cut costs, and drive resilience with real-world steps and success stories.

Step-by-Step Guide to Career Branding: Expert Tips and Strategies
Unlock your potential with a career branding coach. Get expert strategies to boost your career, reputation, and job search success.
Related

ChatGPT API for Beginners: Your Ultimate How-To Guide
Unlock ChatGPT's power! Discover our chatgpt api tutorial for seamless integration and application building with OpenAI's tools.

Claude AI Chat: How to Make the Most of This Powerful Tool
Unlock the full potential of claude ai chat with insights on features, usage tips, and safety considerations for effective AI interaction.

How AI is Transforming Customer Service: A Comprehensive Guide
Discover how AI tools for customer service enhance efficiency, boost satisfaction, and transform experiences in this comprehensive guide.

Unlock Creativity: Top Free AI Tools Online for 2024
Discover top AI tools online free for 2024 to boost creativity and productivity in writing, image, video, audio, and business tasks.

Beginner’s Guide to AI Tools: What You Need in 2024
Discover essential AI tools for beginners in 2024. Learn programming, visualization, writing, and task management tools today!
Unlocking the Power of ChatGPT: Your Ultimate OpenAI Tutorial
Unlock ChatGPT's potential with this openai chatgpt tutorial. Learn setup, advanced usage, API integration, and more. Start now!